Title sequence from The Music of the Spheres, work-in-progress.
Happy with the rotoscoped animation. Debating changing the star field background. Even though I’m drip-feeding my footage for this project — something I swore I wouldn’t do — I actually find it interesting to document the various stages and changes made during the creative process. There’s a lot of back-and-forth and, if you’re not questioning your decisions, then perhaps there’s no opportunity for growth.
Anyway, glad to have completed the digital painting on the rotoscoped animation on Scene 2 just prior to the start of the school term. This project will get shelved until the term quiets down.
UPDATE: Decided to try out another digital star field in After Effects, and I’m happy with this one. Looks more subtle than the previous background.
Last summer, I had the great pleasure of contributing some animation and artwork for the All The Haunts Be Ours Vol. 2 box set from Severin Films. My contributions include a paper puppet theatre, and an animated title sequence for a featurette on the beautifully restored dark fantasy film The Ninth Heart, directed by Juraj Herz. This Czech film boasts an animated sequence by stop-motion maestro Jan Švankmajer and his wife and frequent collaborator, artist Eva Švankmajerová. Their title sequence used a top-down, 2D stop-motion technique with articulated paper puppets, a technique to which my sequence pays humble homage.
This box set looks INCREDIBLE. Many thanks to Kier-La Janisse for enlisting me in this dream commission.
How’s your summer going? I’ve been rotoscoping the first two scenes of my latest animation. Due to all the folds in this costume, I typically manage only 1-2 frames per day. Fortunately, for the sake of my sanity, most of this project will not be rotoscoped. I wanted a certain look in the first three scenes, however, and for that it had to be rotoscoped.
Been learning Toon Boom Harmony and I really like the camera movement feature. Was able to achieve this parallax effect* fairly quickly. Still heaps to learn but I’m digging it.
*when the different elements of a layout move at different speeds, creating a 3D depth effect.
Papercut Puppets will be a vendor at the upcoming Bazaar of the Bizarre. There’s lots to enjoy at this market including performers, DJs and lots of unique, hand-crafted clothes, art and crafts.
As some of you may know, I started my Etsy shop in 2019 as a side project, in part inspired by the paper cutout animations I was creating at the time. I had been making articulated paper puppets for my various film projects and, when I would bring my puppets into the classroom to share with my animation students, they would delight in them as art objects onto themselves. It occurred to me that there was a small market for such things, and thus Papercut Puppets was born.
Jump ahead five years, one pandemic and one concussion later, and I’ve decided to wind things down with my shop. There’s a few reasons for this:
It was only ever conceived as a side hustle with no plans to make it my full-time occupation. I’m happy being an art instructor and animator, and those pursuits will likely remain to be my main focus.
Some of the materials used to make my puppet kits — mainly, the coloured 3mm mini-brad paper fasteners — have all but disappeared from the market. The manufacturers from whom I’ve bought these have stopped selling them, and I’ve not found a comparable replacement.
I’ve run out of the printed bag toppers, cardboard backing boards, and printed promotional cards and have decided not to reorder, since that would mean another 2-3 year commitment.
In short, if you’ve enjoyed my quirky creations over the years, now is the time to purchase before they cease to exist. One of my popular designs, the mermaid, has now sold out and been retired. I have very limited quantities of other designs (the bat and octopus have less than 3 each).
Admission to the Bazaar of the Bizarre is free. April 27th, open to the public from 11am-8pm. Located in Parkdale Hall, 1605 Queen Street West. My Etsy shop is: https://papercutpuppets.etsy.com
5-second morph of the moon into a man-on-the-moon face.
Quick studio update. As the winter term slowly begins to wind down, I’ve stolen a few moments to work on my Music of the Spheres storyboard. Even though the board is not yet complete, I decided to try out a complex morph for an image that will appear in the film. I think I’m happy with this. Have tried adding a boil to the static moments using the turbulence effect in After Effects and I’m not entirely convinced by it. Further explorations are needed.
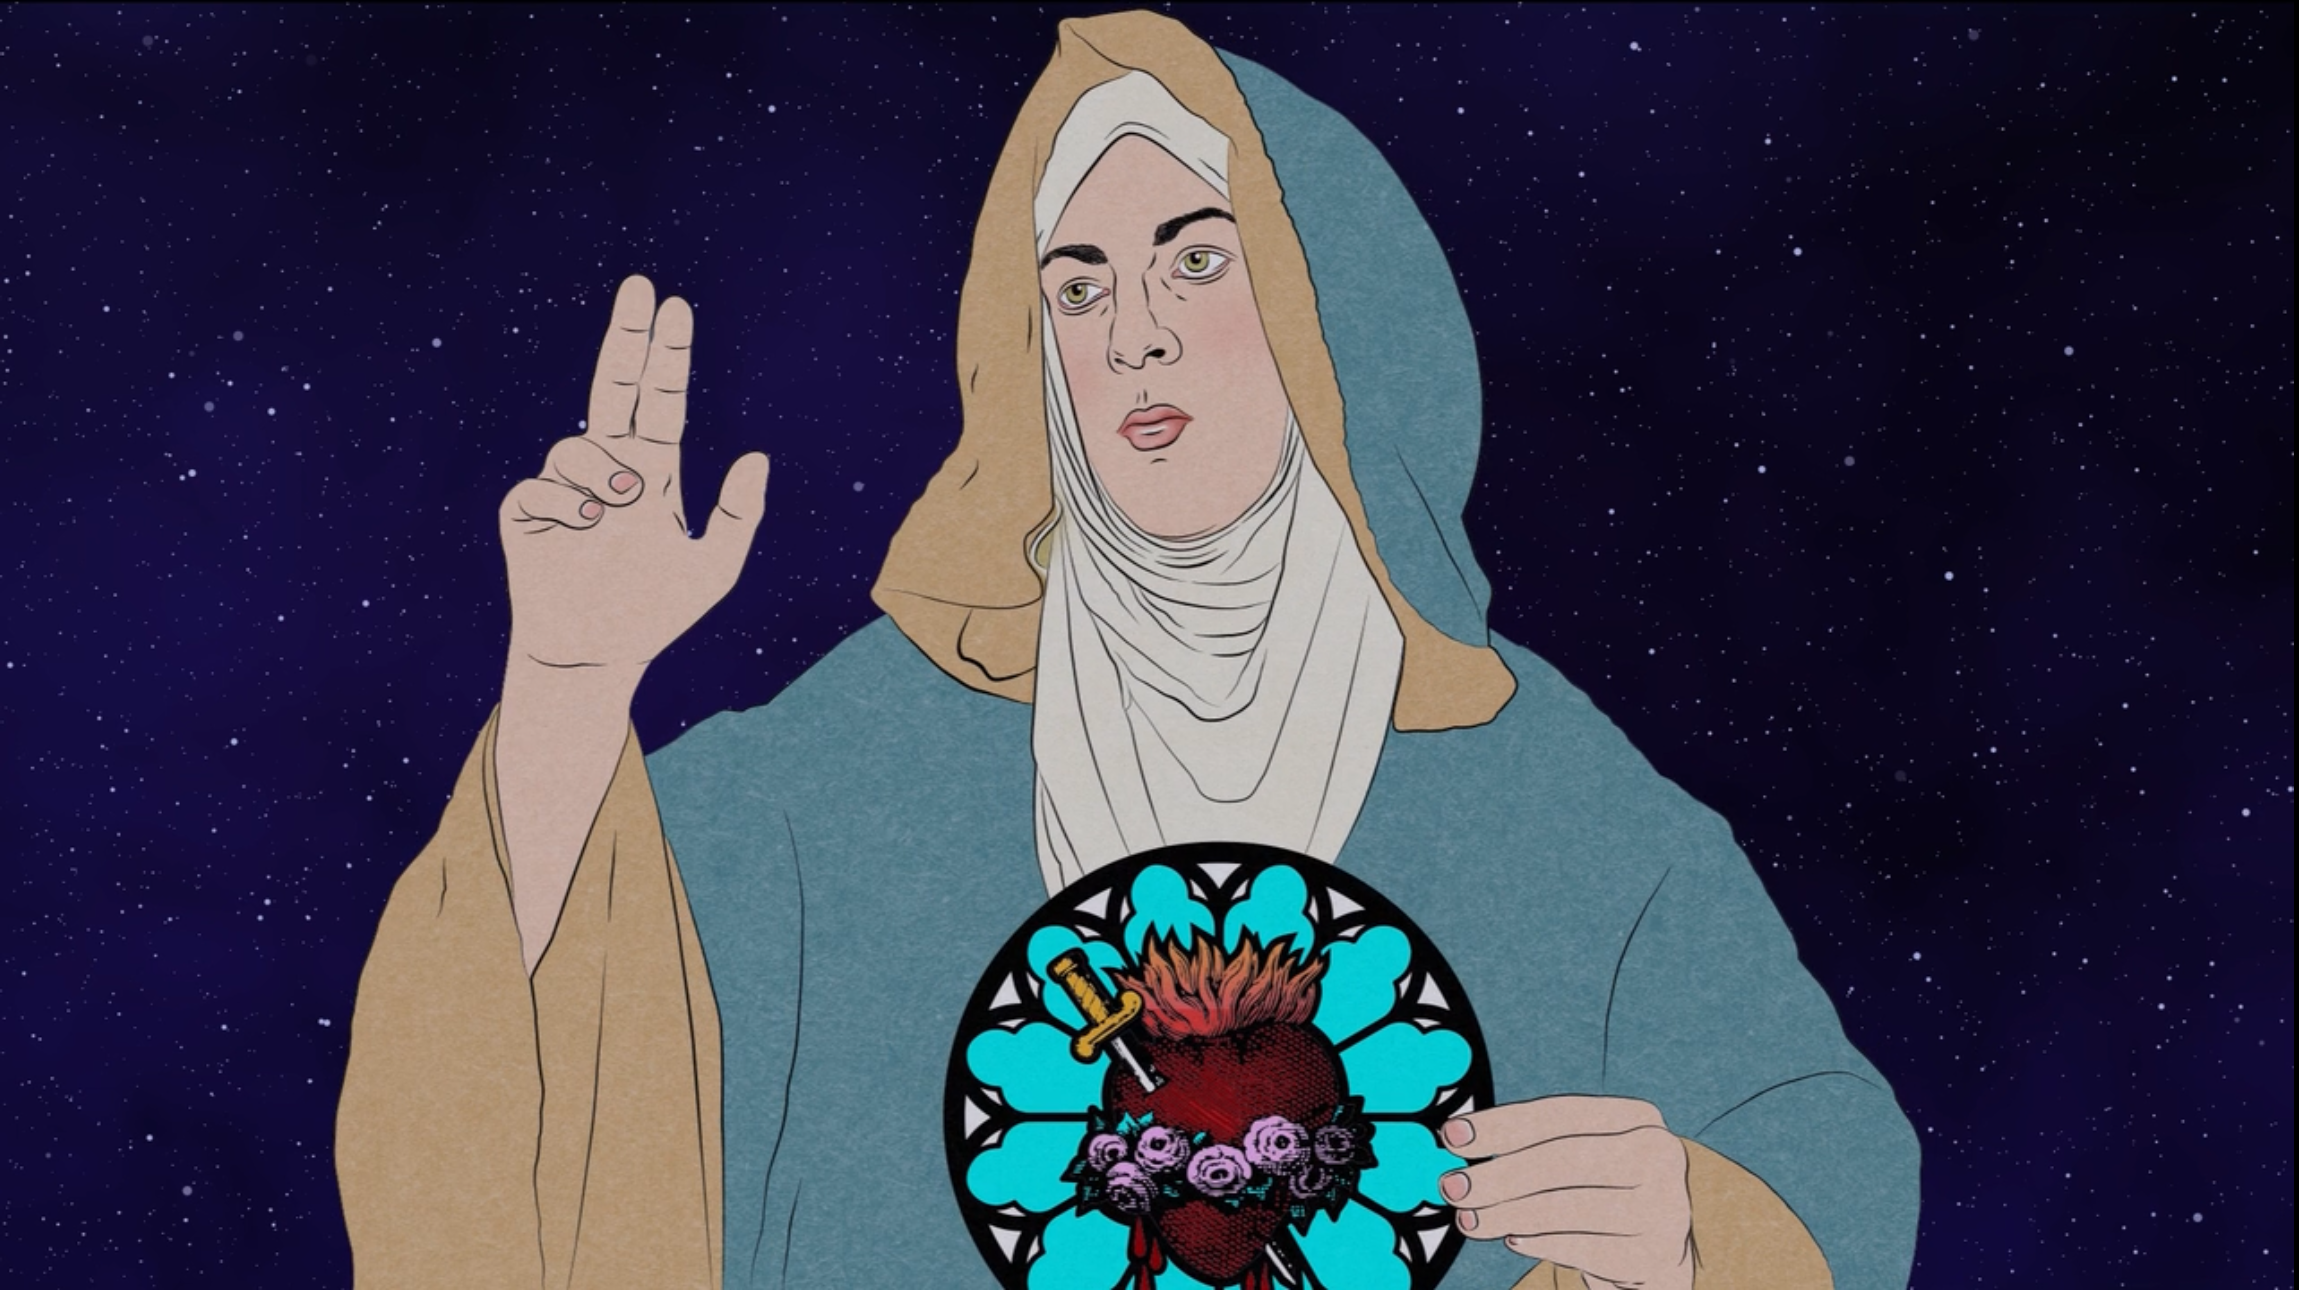
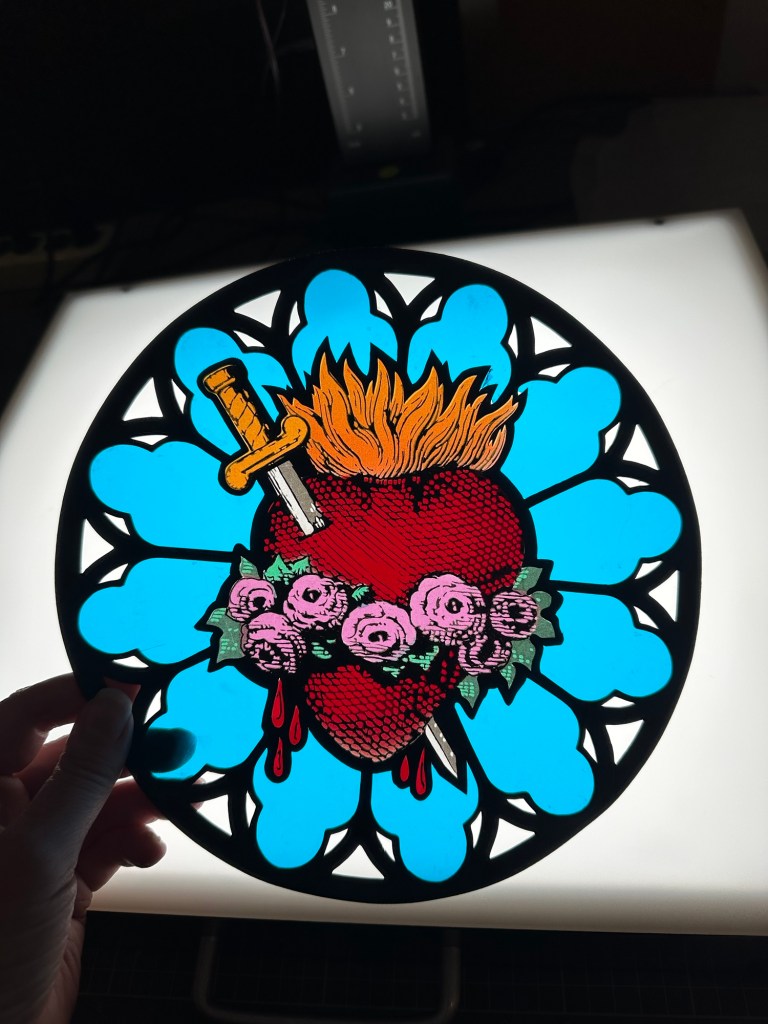
The past couple of weeks I’ve been creating complex paper cutouts with my Silhouette Cameo paper cutting machine. You can create custom art in a drawing software like Adobe Illustrator and then export to the Silhouette software. I’ve used the machine to cut out pieces of black card stock and coloured acetate for that stained glass look. The image of the Immaculate Heart of Mary is a vectorized image taken from the Internet, digitally painted and printed on vellum. This is stuff for a new animation project.
Could I just make these images digitally rather than adding the time-consuming process of cutting and gluing a physical object? Yeah, I could, but I’ve tested this out in After Effects and I just don’t like the purely digital artwork. Looks flat and uninteresting. Besides, paper animation and painstakingly laborious workflows are kinda my brand now. Also, a character will be interacting with this image at a later point in the film, so it makes sense that it’s a physical prop.
The second image is a frame from Dragonframe. It’s darker because I stopped down the exposure so the light box doesn’t wash out the colours.
And, no, I’m not even remotely religious. I do, however, love the aesthetics of religious and esoteric art. That’s the sort of imagery I’m looking at for this project.
Test of the title card composited with the star field background.
Now that the holidays have arrived, I’ve time to play around in my studio. I’ve recently begun work on a new animation project entitled The Music of the Spheres. If this title sounds familiar, it’s because it’s a very old concept dating back to ancient Greece and the mathematician Pythagoras. Known also as musica universalis, it’s “a philosophical concept that regards proportions in the movements of celestial bodies – the Sun, Moon, and planets – as a form of music. The theory, originating in ancient Greece, […] was later developed by 16th-century astronomer Johannes Kepler.” (from Wikipedia). Kepler discovered that the planets were exhibiting all of the ratios found in music, including octaves. They were, by their movements, mathematically expressing both major and minor musical scales.
The soundtrack is a gorgeous piece of music created by contemporary British experimental composer Suzie Shrubb entitled a tintinnabulation of cosmic scintillation. This piece is, quite literally, the music of the spheres. Here’s an excerpt from Shrubb’s statement: “The pitches in this piece correspond to those produced by pulsars from the 47 tucanae globular cluster situated in the region of the tucana constellation, approximately 16,000 light years from earth.” Needless to say, I was thrilled when Shrubb was excited about my film proposal and agreed to license her music as it’s simply perfect.
My plan is to shoot paper-based images on my lightbox using Dragonframe (a frame capture software) in the (probably vain) attempt to animate using light. The short clip seen above is a proof-of-concept test with the soundtrack. The title card disc is black card cut using my Silhouette Cameo 4 paper cutting machine, and the areas of colour are pieces of coloured acetate. I had mentioned in the recent past that I planned to return to my “stained glass style” used in my earlier drawings on Mylar, and this title card is one example of this re-engagement with my older work.
The star field was also created with cut paper, shot on my light box. I tried an entirely digital version of the star field in After Effects (which took minutes, rather than hours, to create), but I simply didn’t like the result. If an asset is not a tangible object at some point in the creative process, I lose all interest in it. Not certain if it’s apparent at this scale, but the stars do pulse at a regular, 1 second interval. I also plan to create frame-by-frame animation which will be printed on vellum and shot on the light box.
This is Krampus, the goat-like demon of Germanic tradition who arrives with Saint Nicholas during the Christmas season. While St. Nick rewards the well-behaved children with gifts, its the role of Krampus to punish misbehaving children. My version of Krampus — while no less grotesque and fearsome than that of the traditional folkloric demon — comes elegantly dressed in a black damask-patterned vest, charcoal grey britches, red waistcoat and matching cravat because even a punishing monster wishes to look his best on Christmas.
Final size of puppet once assembled: 10″ H x 5.5″ W.
Available as a download or a DIY printed puppet kit with paper fasteners included that ships right to your door. Visit my Etsy shop: https://papercutpuppets.etsy.com
I recently enjoyed a trip to Chicago to take in the city (had never visited before) and the Chicago Underground Film Festival, a punk-infused festival of independent filmmaking that I highly recommend. I also highly recommend Chicago. It’s like New York’s scrappy little Midwest cousin who’s tough-as-nails but unexpectedly polite and friendly. Good food, too.
My short film Ouroboros continues its festival run November 5th, 2023 with the Edinburgh Short Film Festival. Sadly, no trip to Edinburgh planned (this time).